Your cart is currently empty!

seoagency@example.com

450 NW Couch Street, Oregon 97209

+(00) 123 4567 890
Importance of a Logo
https://youtu.be/JNQY3dFoK1w?si=hY1qdFXWic7gK0lU
A logo is the visual cornerstone of your blog’s brand. It makes your content instantly recognizable and helps build trust with your audience. A well-designed logo can be used across your website, social media, business cards, and even merchandise, making your brand more cohesive and memorable.
Step 1: Evaluate Your Blog’s Brand
- Define Your Blog’s Purpose and Values: Start by clarifying what your blog is about-whether it’s tutorials, design inspiration, or industry news.
- Identify Your Audience: Who are you targeting-beginners, professionals, or hobbyists?
- Determine Your Unique Selling Proposition: What makes your blog different from others in the graphic design space?
This foundational understanding will guide every design decision you make.
https://pixelvera.site/evolution-of-graphic-designer-in-india-in-2025/
Step 2: Research the Industry and Gather Inspiration
- Analyze Competitors: Look at other successful graphic design blogs and note what works in their logos.
- Collect Visual Inspiration: Use platforms like Pinterest, Behance, or even Google Images to gather ideas for color schemes, typography, and iconography.
- Stay Updated with Trends: Explore logo design blogs for the latest trends and expert inspiration.
Step 3: Choose the Right Logo Type
There are several types of logos to consider:
- Monogram (Lettermark): Uses initials. Great for blogs with long names or if you want a minimal approach.
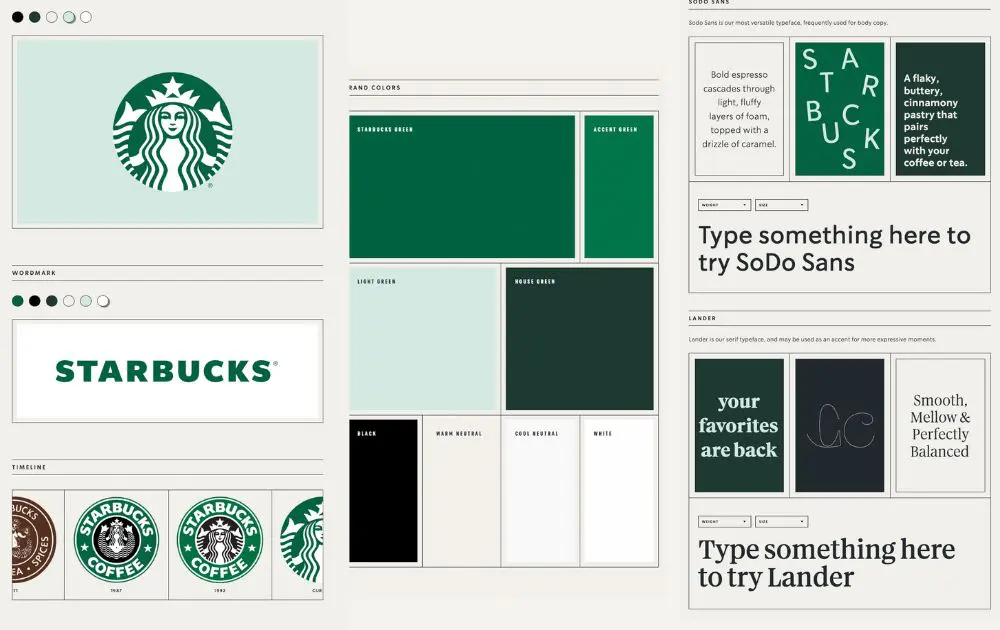
- Wordmark (Logotype): Focuses on the blog’s name with distinctive typography.
- Icon/Symbol: Uses a graphic symbol that represents your brand.
- Combination Mark: Mixes text and a symbol for a versatile logo.
Choose the type that best fits your blog’s personality and branding goals.
Step 4: Sketch and Conceptualize
- Brainstorm Ideas: Start with rough sketches-don’t worry about perfection. Focus on capturing the essence of your blog.
- Experiment with Variations: Try different layouts, fonts, and symbols. Consider how your logo will look at various sizes and on different backgrounds.
Step 5: Create Digital Drafts
- Use Design Tools: Tools like Canva, Adobe Illustrator, or online logo makers such as BrandCrowd make it easy to create professional-quality logos, even if you’re not a design expert.
- Customize Your Design: Adjust colors, fonts, and layouts to match your brand’s personality. Make sure your logo is legible and visually balanced.
- Test Multiple Versions: Create a few variations and see how they look on your blog, social media, and other platforms.
Step 6: Refine and Get Feedback
- Seek Feedback: Share your logo drafts with friends, colleagues, or your audience and ask for constructive feedback.
- Iterate and Improve: Refine your design based on the feedback. Pay attention to details like alignment, spacing, and color contrast.
Step 7: Finalize and Export
- Prepare Multiple Formats: Export your logo in various formats (PNG for web, SVG for scalability, and JPG for general use).
- Create Variations: Prepare different versions for light and dark backgrounds, as well as simplified icons for social media avatars.
Tips for an Effective Logo
- Keep It Simple: A simple logo is more memorable and versatile.
- Make It Relevant: Ensure your logo reflects your blog’s theme and content.
- Choose Readable Fonts: Typography should be clear at all sizes.
- Use Appropriate Colors: Select a color palette that conveys your brand’s mood and stands out online.
Tools and Resources
- Canva: User-friendly and offers customizable templates for blog logos5.
- BrandCrowd: Provides a wide range of logo templates tailored for blogs and allows easy customization.
- Adobe Illustrator: Ideal for advanced users who want complete control over their logo design.
Showcasing Your Logo
Once your logo is ready:
- Add it to your blog’s header and favicon.
- Use it consistently across your social media profiles.
- Include it in your email signature, business cards, and any downloadable resources.
To create a logo with a focus keyword, you can follow these steps:
- Choose your focus keyword: This is the main word or phrase representing your brand or business essence. For example, if your business is about photography, your focus keyword could be “Focus” or “Lens” to reflect clarity and vision.
- Use an AI or online logo maker: Platforms like BrandCrowd or logo.com allow you to enter your business name and focus keyword to generate logo designs automatically.
- Refine your keyword and design: If the initial logos don’t fit your style, try related keywords to get more options. Then shortlist your favorite logos.
- Customize your logo: Adjust colors, fonts, and layout to align with your brand identity. You can add shapes or symbols that relate to your focus keyword for a stronger visual impact.
- Preview and download: See how your logo looks on various mediums like apparel or signage before downloading the final files
Tips for Using Focus Keywords in Logo Creation
1. Choose a Relevant Keyword
Select a focus keyword that truly represents your brand, product, or service. It should be clear, memorable, and directly connected to what you offer.
2. Keep It Simple and Memorable
Incorporate the focus keyword in a way that keeps the logo design simple and easy to remember. Avoid cluttering the logo with too many words or elements.
3. Integrate the Keyword Naturally
If your logo includes text, use the focus keyword as the main element. For visual logos, use imagery or symbols that reflect the meaning of your keyword.
4. Align with Brand Vision and Style
Make sure the keyword and its visual representation match your brand’s identity and target audience. Use fonts, colors, and shapes that reinforce the keyword’s message.
5. Test for Versatility
Ensure the logo looks good in various sizes and formats, and that the keyword remains legible and recognizable in all uses.
6. Avoid Keyword Stuffing
Don’t force the keyword into the design repeatedly. One clear, strong use is better than overuse, which can make the logo look unprofessional
How to Test the Effectiveness of Your Logo
1. Gather Audience Feedback
- Use surveys, focus groups, or online testing platforms to present your logo to your target audience and collect feedback on appeal, memorability, and relevance.
- Ask simple, actionable questions such as “Which logo do you prefer?” or “What does this logo make you think of?” to get clear insights.
2. Test Across Contexts and Touchpoints
- Check how your logo appears on different backgrounds (light, dark) and in various shapes (circle, square, rectangle) to ensure it remains clear and recognizable in all uses.
- Assess its appearance on all brand touchpoints: website, social media, print materials, and merchandise.
3. Use Logo Testing Tools
- Platforms like Logo Lab and Logo Rank allow you to upload your logo and run visual experiments to test scalability, silhouette, and distinctiveness
Categories: Uncategorized
Related Posts :-
Build a Graphic Design Portfolio That Gets You Hired in.
https://youtu.be/5sffVBeaOeY?si=mU-DOl2ZKghmVBI6 A graphic design portfolio is more than a gallery…

Dark Mode and Color Trends in Web Design (2025)
Trends in Web Design Dark mode and evolving color trends are…
Leave a Reply